Lawn Bowls for Beginners

Learn the Basics Properly Now — Play Better for the Rest of Your Bowls Life

Learning lawn bowls the right way from the beginning saves you years of frustration.

The Beginner Pathway gives you clear, simple steps to build solid fundamentals — grip, stance, delivery, draw weight, and consistent line. 

Instead of guessing, copying others, or picking up bad habits, you’ll follow a structured approach that builds confidence, smooth technique, and reliable bowls from day one.

This is the foundation that sets you up for every future role on the green.

Lawn Bowls Grip Sizing

Whether you’re 18 or 80, lawn bowls offers a friendly mix of skill, strategy, and social connection. This guide will walk you through everything you need to start playing . . . from what to wear, how to play, and which core skills to master before moving into your first team role.

A smooth, consistent delivery is the foundation of every good bowler. These are the core skills beginners should master early . . . grip, stance, point of aim, draw and length . . . supported by rhythm, balance, and follow-through.
Each element builds confidence and accuracy over time.

When you’ve covered these basics, you’ll be ready to step into the Lead Role.

Take your time, enjoy each step, and remember . . . every great bowler began right here.

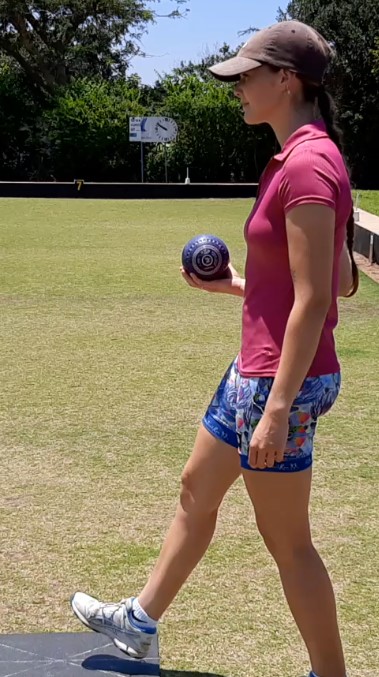
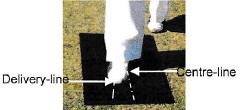
Bowler Stepping Onto Mat
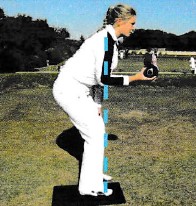
Bowling Stance
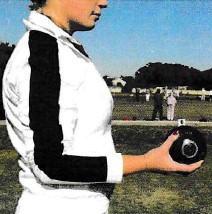
Bowler Stepping Forward
Bowler Delivering Bowl

🧩 Beginner Pathway – 6 Clear Stages

Stage 1: Foundation and Orientation

This stage is about understanding the game before worrying about technique. Many beginners rush straight into how to bowl — but confident, consistent players first understand why the game is played the way it is, how to think on the green, and how to communicate clearly with others.

In this section, you’ll learn . . .

  • The true objective of bowls — what you are really trying to achieve on every end.
  • The right mindset for beginners — how to stay relaxed, patient, and positive while learning.
  • Common lawn bowls terminology — so you can follow instructions, join conversations, and feel comfortable at your club.

These foundations will help you feel less overwhelmed, more confident, and ready to progress through the rest of the Beginner Pathway.

👉 Start here. Build understanding first. Skills come next.

🎯 Objective of Bowls

The goal of lawn bowls is simple . . . roll your bowls closer to the small white ball (the jack) than your opponent. Behind that simplicity lies strategy, consistency, and calm precision.

Focus on distance control and line accuracy, not competition. Building confidence is key.

Key Points:

  • One point is scored for each bowl closer to the jack than the opponent’s nearest.
  • Games are divided into ends; each player delivers all their bowls per end.
  • Focus on smooth delivery, balance, and steady tempo.

🧠 Mindset for Beginners

Every bowler starts somewhere . . . even champions once fumbled their first jack. Your mindset determines your progress.

3 Keys to Success . . .

  • 🧩 Patience: Improvement comes through repetition.
  • 🎯 Consistency: Same stance, same tempo, same release.
  • 🤝 Positivity: Celebrate small wins and keep learning.

“Every great bowler was once a beginner — the only difference is, they kept practicing.”

🔤 Lawn Bowls Terminology A–Z

Understanding the language of lawn bowls helps you learn faster and feel part of the game. Learn these terms gradually and use them during practice. The more you speak the language of bowls, the faster your confidence will grow.

These are the most common terms every new bowler should know . . . explained in simple, practical language.

Icons help you visualize what each term relates to on the green.

👉 Lawn Bowls Terminology A–Z

Stage 2: Environment & Culture

Bowls isn’t just about rolling a bowl — it’s about understanding the environment you’re playing in and the culture you’re joining.

In this stage, you’ll learn how to move confidently around the green, respect the playing surface, and follow the traditions that make lawn bowls one of the most welcoming and respected sports in the world.

This section covers . . .

  • Understanding the bowling environment — greens, rinks, boundaries, and how conditions affect play.
  • Etiquette on the green — where to stand, when to move, and how to show respect to other players.
  • Dress code — what to wear, why it matters, and how club standards vary.
  • Safety first — warming up properly and protecting yourself and others on the green.

By mastering these basics early, you’ll feel comfortable, prepared, and welcomed — whether you’re at your home club or visiting another.

👉 Learn the environment. Respect the culture. Enjoy the game.

🌤️ Understanding the Bowling Environment - The Green

Many first-time bowlers are surprised by how much the playing environment influences every bowl.
Before your first delivery, take a few minutes to explore the green and understand how each feature affects the game.

Respecting the surface and knowing its layout helps you play more confidently and safely.

🌱 The Green (Playing Surface)

📐 The Size of the Green (What Beginners Need to Know)

Not all bowling greens are the same size. While all greens follow international standards set by World Bowls, clubs have flexibility within those limits.

Standard Green Dimensions

A full-size lawn bowls green is typically . . .

  • Square or rectangular.
  • Between 31 m and 40 m across each side.
  • Large enough to allow multiple rinks to be set in different directions.

This applies to both grass and synthetic greens used in . . .

Why Green Size Matters to Beginners

Green size affects . . .

  • End length (how far you are bowling).
  • Perception of weight.
  • Confidence on long shots.
  • Fatigue during a game.

A longer green requires . . .

  • Better length control.
  • Slightly more effort on grass.
  • Greater touch on faster synthetic surfaces.

Green Size vs Rink Length (Important Distinction)

  • The green is the whole playing area.
  • A rink is the marked playing lane on the green.

While the green may be up to 40 m across, the rink length is usually up to 31 m, depending on green size and mat placement.

This is why . . .

  • Some ends feel noticeably longer than others.
  • Length can change when rinks are re-set in a different direction.

Beginner Reality Check

As a beginner . . .

  • You are not expected to judge green size precisely.
  • You are expected to notice when ends feel longer or shorter.
  • You should adjust length, not your delivery technique.

Beginner mindset:
“The green has changed — I adjust my weight, not my action.”

Grass vs Synthetic – Size Perception

  • Grass greens often feel longer, especially when slow or damp.
  • Synthetic greens may feel shorter because bowls travel faster.
  • Indoor synthetic greens can feel very long due to speed and consistency.

This is why beginners often bowl through the head indoors or on fast synthetics at first.

🧭 Beginner Position Tip

If you’re suddenly bowling long or short, ask yourself . . .

  • Is this a different green?
  • Are the rinks set a different way?
  • Has the surface changed?

Awareness comes before adjustment.

Where this Knowledge Fits in the Pathway

Understanding green size prepares you for . . .

  • Mat placement.
  • Jack length.
  • Weight control.
  • Indoor vs outdoor adaptation.
  • Confidence on unfamiliar greens.

Natural Grass Greens

Natural grass greens are living surfaces and change regularly. What affects them . . .

  • Grass species and seasonal growth.
  • Cutting height (typically 3–6 mm).
  • Moisture, rain, and humidity.
  • Rolling and mowing frequency.
  • Wear patterns from foot traffic.
Typical characteristics . . .
  • Speed varies daily.
  • Bias can feel inconsistent.
  • Greens often slow down when damp.
  • Faster after rolling and in dry weather.
Beginner experience . . .
  • Longer shots require more effort.
  • Length control develops through feel.
  • Observation is critical.

Grass greens reward patience and adaptability.

Synthetic Greens

Synthetic greens are engineered for consistency and durability.

Construction basics . . .

  • Short synthetic fibres.
  • Sand or rubber infill.
  • Installed over a compacted base.

What affects them . . .

  • Surface age and compaction.
  • Heat (can significantly increase speed).
  • Direction of manufacture (may slightly influence draw).

Typical characteristics . . .

  • Generally faster than grass.
  • More uniform across the rink.
  • Minimal daily variation.

Beginner experience . . .

  • Bowls appear to “run away” early.
  • Lighter delivery is required.
  • Confidence builds faster once speed is understood.

Indoor bowls are almost always played on synthetic surfaces.

🌤️ Understanding the Bowling Environment - Banks and Ditches

🧱 Banks and Ditches

The Ditch

Not all bowling greens are the same size. While all greens follow international standards set by World Bowls, clubs have flexibility within those limits.

Standard Green Dimensions

A full-size lawn bowls green is typically . . .

  • Square or rectangular.
  • Between 31 m and 40 m across each side.
  • Large enough to allow multiple rinks to be set in different directions.

This applies to both grass and synthetic greens used in . . .

Why Green Size Matters to Beginners

Green size affects . . .

  • End length (how far you are bowling).
  • Perception of weight.
  • Confidence on long shots.
  • Fatigue during a game.

A longer green requires . . .

  • Better length control.
  • Slightly more effort on grass.
  • Greater touch on faster synthetic surfaces.

Green Size vs Rink Length (Important Distinction)

  • The green is the whole playing area.
  • A rink is the marked playing lane on the green.

While the green may be up to 40 m across, the rink length is usually up to 31 m, depending on green size and mat placement.

This is why . . .

  • Some ends feel noticeably longer than others.
  • Length can change when rinks are re-set in a different direction.

Beginner Reality Check

As a beginner . . .

  • You are not expected to judge green size precisely.
  • You are expected to notice when ends feel longer or shorter.
  • You should adjust length, not your delivery technique.

Beginner mindset:
“The green has changed — I adjust my weight, not my action.”

Grass vs Synthetic – Size Perception

  • Grass greens often feel longer, especially when slow or damp.
  • Synthetic greens may feel shorter because bowls travel faster.
  • Indoor synthetic greens can feel very long due to speed and consistency.

This is why beginners often bowl through the head indoors or on fast synthetics at first.

🧭 Beginner Position Tip

If you’re suddenly bowling long or short, ask yourself . . .

  • Is this a different green?
  • Are the rinks set a different way?
  • Has the surface changed?

Awareness comes before adjustment.

Where this Knowledge Fits in the Pathway

Understanding green size prepares you for . . .

  • Mat placement.
  • Jack length.
  • Weight control.
  • Indoor vs outdoor adaptation.
  • Confidence on unfamiliar greens.

Natural Grass Greens

Natural grass greens are living surfaces and change regularly. What affects them . . .

  • Grass species and seasonal growth.
  • Cutting height (typically 3–6 mm).
  • Moisture, rain, and humidity.
  • Rolling and mowing frequency.
  • Wear patterns from foot traffic.
Typical characteristics . . .
  • Speed varies daily.
  • Bias can feel inconsistent.
  • Greens often slow down when damp.
  • Faster after rolling and in dry weather.
Beginner experience . . .
  • Longer shots require more effort.
  • Length control develops through feel.
  • Observation is critical.

Grass greens reward patience and adaptability.

Synthetic Greens

Synthetic greens are engineered for consistency and durability.

Construction basics . . .

  • Short synthetic fibres.
  • Sand or rubber infill.
  • Installed over a compacted base.

What affects them . . .

  • Surface age and compaction.
  • Heat (can significantly increase speed).
  • Direction of manufacture (may slightly influence draw).

Typical characteristics . . .

  • Generally faster than grass.
  • More uniform across the rink.
  • Minimal daily variation.

Beginner experience . . .

  • Bowls appear to “run away” early.
  • Lighter delivery is required.
  • Confidence builds faster once speed is understood.

Indoor bowls are almost always played on synthetic surfaces.

🌤️ Understanding the Bowling Environment - Wind Sock

Wind Sock

Every bowling club has a wind-sock on a flag pole to show the direction and strength of the wind. Look for the wind sock positioned near the green . . . it’s more important than it seems!

The direction and strength of the wind can alter the path of a bowl dramatically. Even a light breeze can push a bowl wider or shorten its line.

Check the wind sock before each end and notice how it aligns with your bowl’s curve.

🌤️ Understanding the Bowling Environment -  Green Speed & the Stimp Meter

The stimp meter is a simple measuring tool used to determine the speed of a bowling green.
It works by releasing a bowl (or ball) from a fixed slope and measuring the distance it rolls in a straight line.

  • Longer distance = faster green.
  • Shorter distance = slower green.

At many clubs, the recorded green speed is displayed near the green using a clock-style indicator.
This display shows numbers around a circular face with a pointer or arm marking the current speed, allowing players to quickly see how fast the surface is playing before stepping onto the mat.

  • Higher number = faster green.
  • Lower number = slower green.

This allows players to quickly understand the playing pace before stepping onto the mat.

Understanding green speed is important because it directly affects the weight of your delivery.
On faster greens, bowls require less effort and travel further with a smooth, gentle release.
On slower greens, bowls need more weight and follow-through to reach the same length.

Indoor vs Outdoor Green Speed

  • Indoor and synthetic surfaces are usually more consistent and often faster, allowing bowls to run smoothly with minimal resistance.
  • Outdoor grass greens can vary significantly depending on moisture, temperature, mowing height, rolling, and general maintenance. They may feel slower in the morning, faster in dry afternoon conditions, or change after rain.

Because of these natural variations, green speed can change from day to day—and even during the same day.

Practical Tip for Beginners

Always roll a few trial bowls before play to develop a natural “feel” for the pace of the green.
This short adjustment period helps you match your delivery weight, rhythm, and confidence to the current conditions, leading to more consistent results.

🧭 Etiquette on the Green

Lawn bowls is more than a game of skill . . . it’s a sport built on sportsmanship, respect, and courtesy.
Good etiquette keeps the game enjoyable for everyone, helps play flow smoothly, and creates the friendly atmosphere that makes bowls so special.
Every bowler, regardless of experience, shares responsibility for maintaining these traditions.

  Learn the Etiquette of the Green →

👕 Dress Code

Lawn bowls has a proud tradition of neat and practical dress. Comfort and respect for the green are key.

Checklist:

  • Shorts, skirts, trousers, or skorts — knee length or longer for comfort and modesty.
  • Shirts with a collar — usually in your club’s colours.
  • Hats, peaks or caps — wide-brimmed hats are preferred for sun protection; caps and peaks are acceptable.
  • Flat-soled, heel-less shoes — essential to protect the green surface; shoes must be clean and have little tread or raised heels.
  • Sunscreen and hydration: Always apply sunscreen before play and bring a water bottle to stay hydrated.

The green is a shared playing surface . . . wearing flat-soled shoes and following dress guidelines shows respect for both the game and your club.

💪 Safety First – Warm-Up Before You Play

Before stepping onto the green, take a few minutes to prepare your body . . . just as any athlete does before competition. Bowling might look gentle, but it still uses your shoulders, lower back, hips, and knees.
A short warm-up improves flexibility, reduces injury risk, and helps you find a smoother, more consistent delivery from the A light warm-up not only prevents strain but also loosens your muscles and joints, helping you deliver each bowl with smooth, controlled movement from the very first end.

 View Warm-Up Exercises in the Technique Hub ›

Stage 3: Equipment & Setup

This stage helps you make simple, confident choices about bowls, sizing, and basic setup—without unnecessary cost or confusion. You’ll also begin to understand how bowls behave, and how these practical details influence every delivery you play.

This section covers . . .

  • Basic Equipment and Costs — essential bowls gear, simple accessories, and realistic beginner costs.
  • Bowls Makes & Selection — main bowl brands, model differences, and indoor vs outdoor suitability.
  • Choosing Your Bowl Size — correct hand fit for comfort, control, and confident delivery.
  • Bowl’s Running Surface: Indoor vs Outdoor Bowling — narrow and wide running surfaces and how they perform on different greens.
  • Understanding Bias — why bowls curve, how to read the bias side, and how it guides your aim.

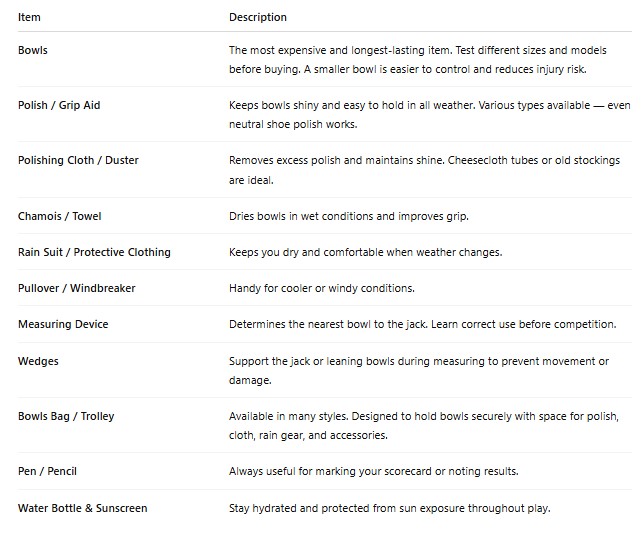
🟢 Basic Equipment and Costs

When starting out, many clubs have ‘loan’ sets of bowls you can use during early coaching sessions.
Once you’re ready to buy your own, you’ll need a few basic items . . .

Lawn Bowling Equipment Costs

Tip: New bowlers often start with second-hand bowls from other members or pro shops — it’s a cost-effective way to find the right size and bias before investing in a new set.

💰 Club and Competition Fees

When you join a club, a few standard costs apply to cover facilities, administration, and association membership . . .

  • Club Entrance Fee: A once-off fee when joining the club.
  • Club Annual Fees: Paid yearly to maintain membership and facility use.
  • Affiliation Fees: These go to the National Bowling Body and your Provincial or District Association, allowing you to compete officially.
  • Green Fees: A small fee (per game or competition) that supports green maintenance.
  • Competition Entries: Most local events and leagues require a modest entry fee.

Costs vary by club and region, but most clubs are very welcoming to beginners and offer affordable starter memberships.

📝 Joining a Club

To become a member . . .

  • Complete a club application form — available from the club secretary or website.
  • Your completed form will be displayed on the club’s noticeboard for a few weeks for existing members’ review and approval.
  • Once approved, you’ll receive a welcome from the committee, your membership details, and your Bowls affiliation number.
  • You’ll then be eligible to play in club games, leagues, and district competitions

Many clubs also offer introductory coaching sessions for new members at no extra cost — a great way to learn the basics and meet other bowlers.

🌞 Additional Essentials

  • Sunscreen and sunglasses for UV protection.
  • Water bottle — hydration is key when playing and particularly during long games.
  • Club etiquette awareness — always greet opponents and respect the green.
  • Positive attitude — bowls is as much social as it is competitive.

Getting started in bowls is simple, affordable, and rewarding.
Once you’ve joined a club and have your basic gear, you’ll be part of a welcoming community where skill, sportsmanship, and fun come together on the green.

🟢 Bowls Makes & Selection – Finding the Perfect Model for Your Game

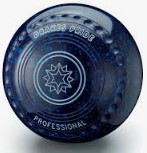
The first essential item for playing bowls is a set of four identical bowls, each manufactured to international specifications approved by World Bowls (WB). Every bowl in the set must be identical in size, weight, colour, and bias, and carries the same distinguishing emblem engraved on both sides — with the smaller emblem indicating the bias side, the direction in which the bowl curves during its path.

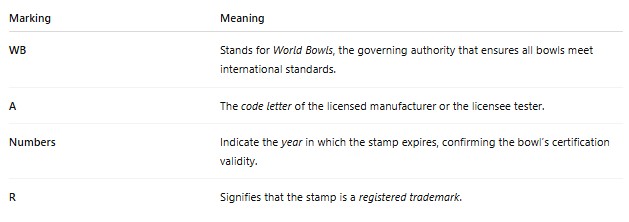
Each bowl is stamped and engraved with important identification markings. You’ll find a small circle on the side of the bowl containing these details . . .

The Meaning of Lawn Bowls Markings

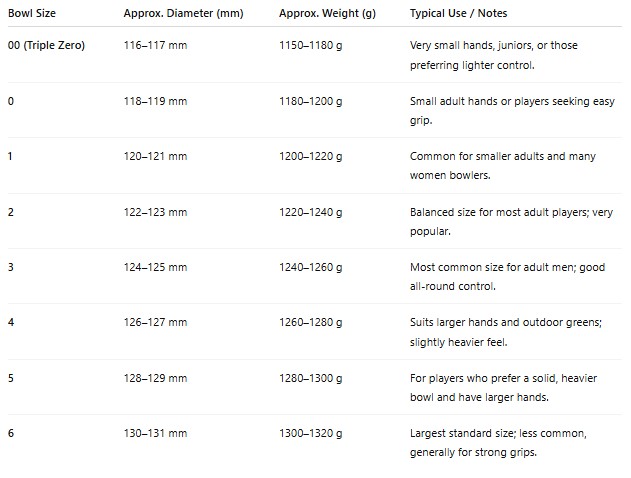
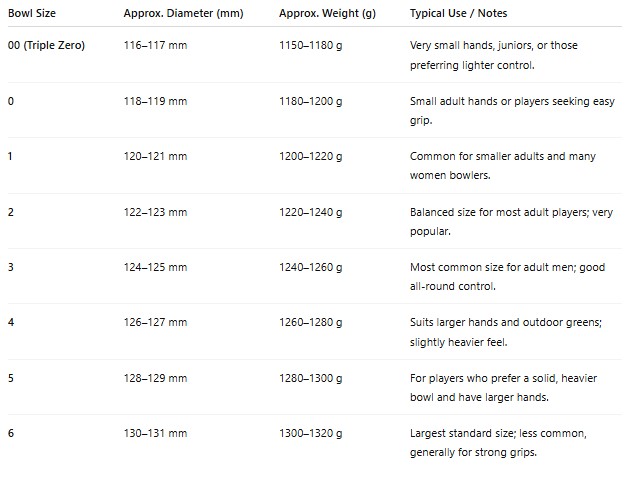
Bowls vary in size from 00 (triple zero), the smallest, up to size 6, the largest. The difference in size between the smallest and largest bowl is only about 12.8 millimetres, yet that small variation can significantly affect handling and comfort.

Lawn Bowls Sizes

Traditionally, bowls were black and brown and made from hard composite materials, but today they are available in a variety of colours and patterns to suit individual preferences.

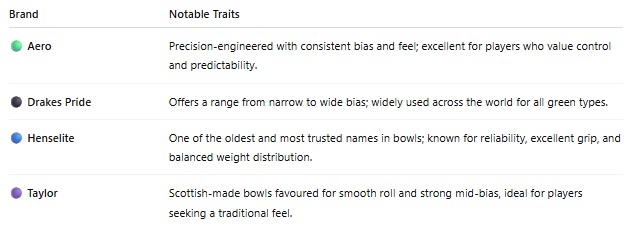
Brands and Bias Characteristics

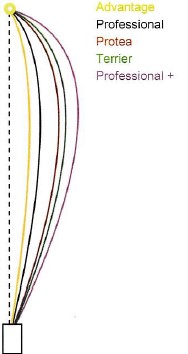
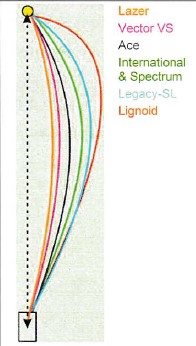
There are many different brands and models of lawn bowls, each designed with its own bias shape and line characteristic. Some models have a wider swinging bias, ideal for outdoor play on slower greens, while others are narrower and straighter, better suited to indoor or fast synthetic greens.

Popular bowl manufacturers include . . .

Lawn Bowls Models

Each model within these brands behaves slightly differently. Even if two bowls are the same size and weight, their bias line and feel can differ.

Henselite Bias

Henselite

Drakes Pride Bias

Drakes Pride

Tayloe Bias

Taylor

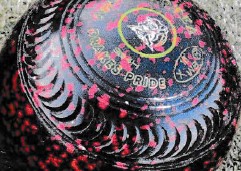
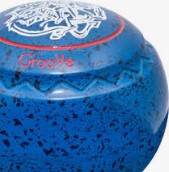
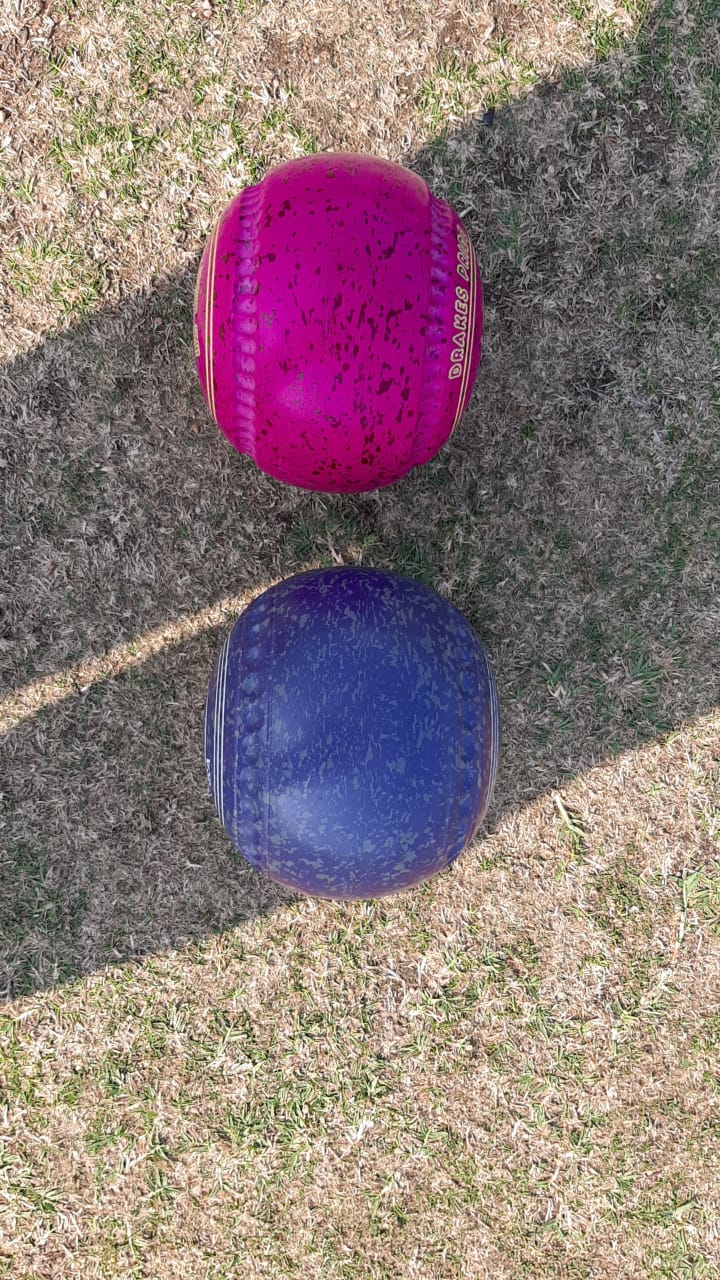
Dimples, Crescent Dimples, and Line Dimples

All bowls have grip patterns designed to improve comfort, control, and confidence during delivery. The most common are dimples, crescent dimples, and line dimples.

Drakes Pride Dimples
Taylor Dimples
Crescent Dimples
Aero Dimples

Each grip style offers a slightly different feel and level of control, so it’s worth experimenting with a few designs to see which one best matches your hand size and delivery technique.

Practical Guidance for Players

If you . . .

  • Struggle with weight indoors → try a narrower running surface.
  • Feel inconsistent outdoors → consider a wider running surface.
  • Play both regularly → choose bowls that sit mid-range, then adjust delivery.

👉 Equipment should support your natural delivery, not force you to rebuild it every season.

🧭 Choosing Your Bowl Size

Choosing the correct bowl size is one of the most important early decisions you’ll make. A poor choice can lead to inaccurate lines, loss of grip, and even wrist strain . . . so it’s worth getting right from the start. Follow this quick guide before you buy.

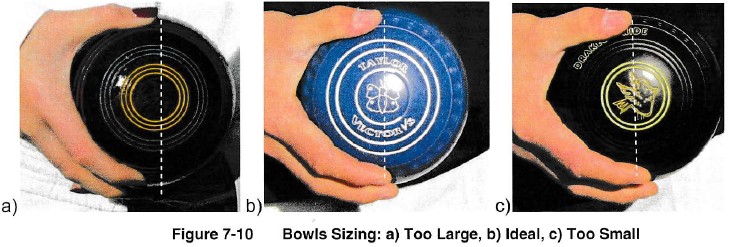
Check Your Hand Fit

  • Hold the bowl in your non-dominant hand (your left hand if you bowl right-handed), with the small emblem facing upward.
  • Place your thumb and index finger around the dimples or rings.
  • Your thumb and finger should form a straight line across the surface of the bowl.
  • If your fingers stretch too far, the bowl is too small.
  • If your fingers stretch too far, the bowl is too small.
Lawn Bowls Sizing
Bowl Sizes

💡 Tip: Try this several times with different sizes. You’ll quickly feel which size provides natural control.

Test the Weight

Bowls come in several weight options, even within the same size.

  • Hold the bowl out to your side with a relaxed arm.
  • If it pulls your wrist downward or causes strain, it’s too heavy for prolonged use.
  • If it feels unstable or light, it may lack the balance needed for a smooth delivery.
  • Heavier bowls stay steadier in windy conditions and follow a stronger bias line, but require more wrist strength.

  • Lighter bowls are easier to handle, especially for indoor or fast greens.

💡 Comfort equals quality: your bowl should feel secure but comfortable . . . firm in your hand without squeezing. Match your bowl’s weight to your strength and green conditions . . . comfort and control always come first.

Bowl Size and Grip Feel

  • Indoor players often prefer slightly smaller sizes for finer hand control.

  • Outdoor players may prefer a fuller hand fit for stability and repeatability.

    💡 A bowl that feels “perfect” indoors may feel unstable outdoors.

🧭 Bowl's Running Surface: Indoor vs Outdoor Bowling

Bowls Running Surfaces

When choosing bowls, it’s not just the brand or size that matters.
The width of the running surface (the band underneath the bowl that contacts the green) plays a big role in how the bowl feels, rolls, and behaves — especially when moving between indoor (syntheitc) and outdoor (grass) greens.

Understanding this early helps you make better equipment choices and avoid unnecessary delivery changes.

What Is the Running Surface?

The running surface is the band on the underside of the bowl that makes contact with the green.

  • Narrow running surface → less contact with the green.
  • Wide running surface → more contact with the green.

This one design feature influences . . .

  • Stability.
  • Friction.
  • Speed sensitivity.
  • Required delivery technique.

Green Speed & Consistency . . .

  • Indoor greens are uniform and predictable.
  • Outdoor greens vary with . . .
  • Moisture.
  • Grass length.
  • Wind.
  • Wear patterns.

Temperature & Surface Interaction . . .

  • Indoor: temperature-controlled, predictable roll.
  • Outdoor: heat and humidity change how bowls grip and turn

Wider running surfaces handle these variables better.

Narrow Running Surface (Common Indoors / Synthetic)

What you’ll notice . . . 

A narrow running surface produces less friction, which means . . .

  • The bowl comes out of the hand faster.
  • Small changes in weight or release are more noticeable.
  • The bowl feels lighter and more responsive.

Best suited for . . .

  • Indoor greens.
  • Fast synthetic greens.
  • Very quick outdoor conditions.
Delivery Adaptations Required . . . 

To deliver a narrow-surface bowl consistently, players often need to . . .

  • Shorten the backswing.
  • Use a lighter grip pressure.
  • Maintain a lower, smoother release.
  • Controlled release, avoid “pushing” the bowl at the point of delivery.

👉 On very fast greens, many players report the bowl almost rolling off the fingers rather than being swung through.

Pros

  • Excellent length control on fast surfaces.
  • Easier to get bowls past the head indoors.
  • Responsive and lively feel.

Cons

  • Less forgiving of poor release.  
  • Can magnify nerves and tension.
  • Requires refined rhythm and touch.

Wide Running Surface (Common Outdoors / Grass)

What you’ll notice . . . 

A wide running surface creates more friction, resulting in . . .

  • Greater stability through the roll.
  • More forgiveness if your release isn’t perfect.
  • A smoother, more predictable reaction.

Best suited for . . .

  • Outdoor grass greens.
  • Slower or heavier surfaces.
  • Wind-affected conditions.
Delivery Adaptations Required . . . 

With a wide running surface, players can . . .

  • Use a fuller pendulum swing.
  • Apply slightly firmer weight.
  • Focus on rhythm rather than finesse.

👉 The bowl stays on line more easily, especially on uneven or changing grass conditions.

Pros

  • More stable and forgiving.
  • Excellent control on slower greens.
  • Ideal for outdoor consistency.

Cons

  • Can struggle on very fast surfaces.  
  • Requires more effort for longer ends.
  • May feel sluggish indoors.

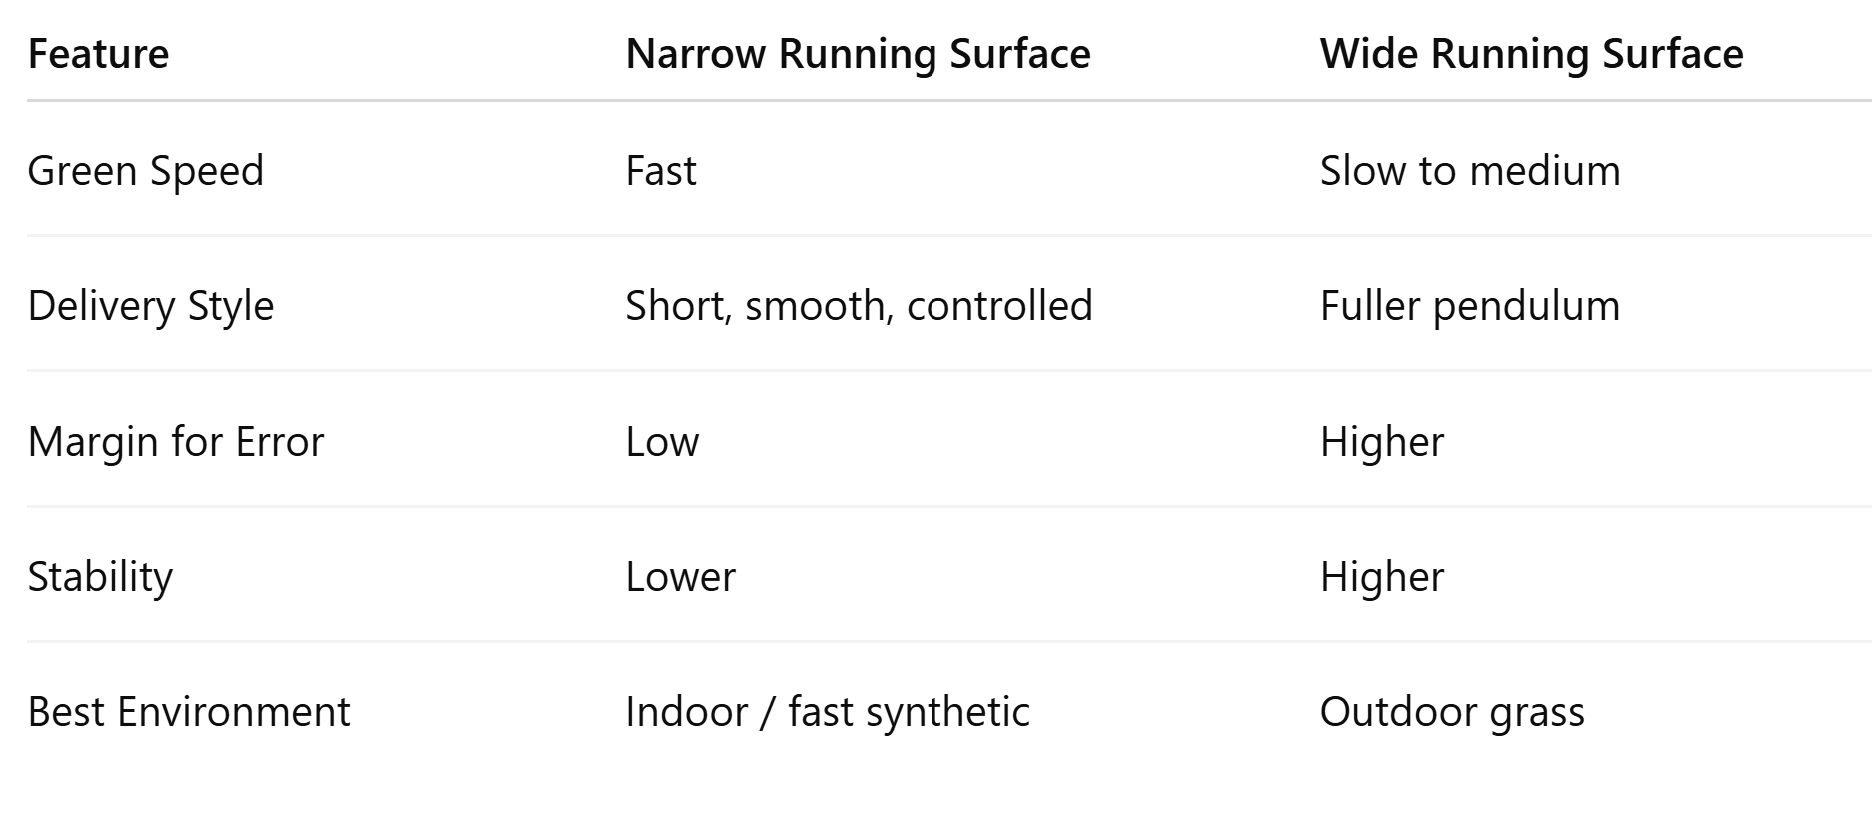
Key Delivery Differences at a Glance

Narrow versus Wide Bowl's Running Surface

One Set of Bowls or Two?

Many progressing players eventually reach this decision . . .

  • One “compromise” bowl for all conditions; OR
  • Two specialised sets . . .
  • Narrow for indoor / fast synthetic.
  • Wide for outdoor grass.

💡 For bowlers serious about performance, two sets reduce the need for constant technical adjustment.

🌀 Understanding Bias

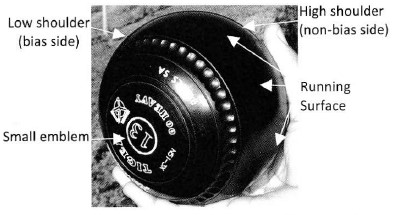
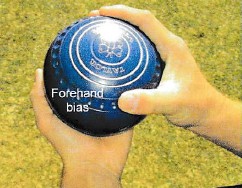
Every bowl has a bias . . . a built-in curve that makes it turn as it rolls. The bowl is not a complete sphere. When viewed from the side, it's perfectly round. But, when viewed from the front or back, the bowl has a definite bulge on one side and is flat on the other. The side with the bulge is referred to as the 'low shoulder' and has a small emblem in the centre. The flatter side, referred to as the 'high shoulder', is indicated by a larger emblem. Both shoulders are engraved with an identical number of rings and/or dimples.

When the bowl is delivered, it will run approximately 3/5 of its journey on the middle or 'running surface' before beginning its bend towards the jack.

Bowl Bias

Try this simple demonstration . . .

  • Place the mat on the centre line.
  • Roll a bowl down the centre line with the large emblem facing outwards — this is your forehand.
  • Then roll it again with the small emblem facing outwards — this is your backhand.
  • Watch how each bowl curves differently from the centre line.

   Observation . . .

The bowl’s curve isn’t caused by spin . . . it’s built into its shape. Understanding this natural arc helps you read the head and plan every shot.

NB: New bowlers often focus only on the jack, but true consistency starts with grip comfort and bias awareness.
Spend time feeling how each bowl rolls, adjusting your line until you can predict its path.
Once your size and bias feel right, you’ll quickly develop a natural touch for both distance and control.

Bias Perception . . .

  • Narrow running surfaces can make the bias feel sharper and quicker.
  • Wide running surfaces produce a rounder, slower arc.
       This affects . . .
  • Point-of-aim selection.
  • Confidence on tight lines.
  • Tactical shot choices.

Stage 4: Game Setup

Before learning the full delivery, it’s important to understand how each end of play begins. In lawn bowls, the mat placement sets the starting position for every bowl delivered and can subtly influence line, length, and tactical options.

This short stage introduces the simple rules and practical awareness of mat positioning, helping you feel confident and ready to step onto the mat with purpose as you move into the delivery fundamentals that follow.

🎯 Mat Placement – Setting the Stage

The mat is your “launch pad.” Every delivery in lawn bowls begins with the mat, so learning how to position and use it correctly is the first step toward a consistent game.
The mat defines your delivery space, your stance, and even the tactical opportunities available in each end.

Mat Distance and Legal Placement

The mat is used as the point from where the bowler must deliver the jack or bowl towards the head. According to the Laws of the Game, the mat must not be laid closer than 2 metres from the back ditch and the minimum distance from the front of the mat to the jack is 23 metres.

When Placing the Mat

  1. 1
    Face the bank to locate your rink number:
    Stand facing the bank (with your back to the direction of play) and identify your rink number.
    This ensures you’re positioned squarely to the rink before placing the mat.
  2. 2
    Position the mat squarely on the centre line:
    Place the mat so that it sits perfectly centred and evenly divided across the centre line of the rink.
    The front edge of the mat should be aligned straight across the rink, positioned in line with the rink number.
    This alignment ensures the mat is straight, balanced, and correctly positioned for play.
  3. 3
    Check the logo direction and safety:
    If the mat has advertising, branding, or a logo, make sure it faces away from the direction of play — that is, toward the back of the mat, not toward the jack.
    This maintains a professional appearance, follows club presentation standards, and helps prevent players from slipping on glossy or printed sections of the mat during delivery.

Anchor Foot and Foot Faulting

During delivery, your anchor foot (right foot for right-handers, left for left-handers) must remain on or directly over the mat until the bowl has been released.
Stepping completely off the mat before delivery is known as foot faulting, which results in a penalty and the bowl being declared dead.

To stay legal and balanced . . .

  • Keep at least part of your anchor foot in contact with or above the mat during release.
  • Allow your stepping foot to move naturally forward, but ensure your anchor foot remains controlled.
  • Good bowlers develop rhythm without losing mat contact — it’s a sign of control and discipline.

“If the foot leaves the mat too soon, the bowl leaves the line too soon.” Staying anchored maintains direction and accuracy.

Consistency and Awareness

Once the mat is placed, always check . . .

  • That it sits flat and square on the line.
  • That it’s not curling or lifting at the corners.
  •  That all players agree on its position before rolling the jack.

Stage 5: Delivery Fundamentals

This stage focuses on the essential foundations of a smooth, repeatable delivery . . . beginning with the grip, then developing a balanced stance, followed by a controlled delivery, and finally linking everything together through rhythm and coordination.

These fundamentals form the heart of consistent bowling. By learning them step by step, you will begin to feel more stable, confident, and accurate each time you step onto the mat.

This section covers . . .

  • The Grip — secure, relaxed hand position for smooth and controlled release.
  • The Stance — balanced body alignment for stability, aim, and consistency.
  • The Delivery — a smooth pendulum motion that controls line and length.
  • Rhythm & Coordination – “Ball-to-Bowl” Exercise — timing and flow to link movement into one repeatable action.

✋ The Grip – Holding the Bowl Correctly

A correct grip is the foundation of every accurate delivery.
Your hold should feel secure but relaxed — firm enough to control the bowl, yet gentle enough to allow a smooth, natural release.
The Grip is taken BEFORE stepping onto the Mat and need not be examined again.

Step-by-Step Guide

Grip - Step 1
Grip - Step 2
Grip - Step 3
Grip - Step 4
  • Start with your non-bowling hand:
    Hold the bowl in your non-bowling hand, palm facing upward.
    This gives you full control as you position your fingers correctly before transferring to your bowling hand.
  • Check the bias direction:
    Look at the emblem and make sure it will face the correct direction for the shot you’re about to play — forehand or backhand. This helps you visualize how the bowl will curve once released.
  • Rest the bowl on your finger pads:
    When you transfer it to your bowling hand, the bowl should rest mainly on your middle finger pads, not on your full palm. This allows better touch, smoother release, and more consistent line control.
  • Finger positioning:
  •  Place your thumb and index finger comfortably around the rings or dimples on the side of the bowl.
  • Your little finger should rest lightly on the opposite rings or dimples — not on the side of the bowl or curled under — as this can cause the bowl to wobble on delivery.
  • These three fingers stabilize the bowl while your middle fingers control the roll.
  • Keep your thumb clear of the running surface:
    Never place your thumb onto the smooth running surface. This can cause the bowl to wobble or veer off line during release.
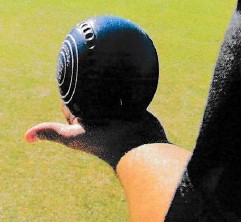
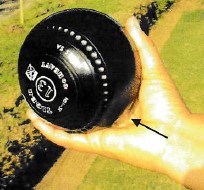
  • Gap in the Palm:
    There should be a small natural gap between the bowl and your palm — the bowl should rest on your fingers, not be clutched into the hand. This allows a smoother, more controlled release.
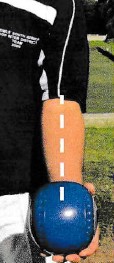
  • Alignment for control:
    Hold the bowl so that the centre line of the bowl aligns with the centre of your forearm.
    This keeps your delivery straight and stable, reducing twisting or off-angle releases.
  • Feel the balance:
    Rock the bowl slightly in your hand — it should feel balanced, not heavy on one side.
    Adjust your grip until it feels steady and comfortable.

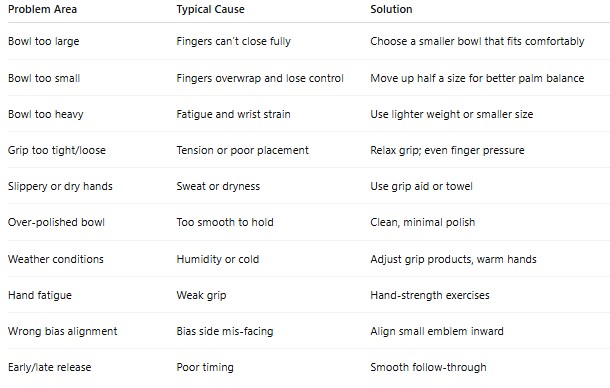
Improving Grip and Comfort

If your bowl feels unsteady or slips easily, it could be . . .

Grip Issues With Fixes

Bowl control starts with comfort and confidence. A light, secure grip supported by the right product ensures the bowl feels like an extension of your hand.

🦶 The Stance – Setting Up for Success

Your stance is the foundation of a smooth and consistent delivery. It determines your balance, alignment, and control — three essentials for accurate bowling. A stable stance prepares the body to move naturally along the delivery line and sets you up for success before the bowl even leaves your hand.

Stance - Step 1
Stance - Stepping Foot Parallel to Anchor Foot
Stance - Right Arm Parallel to Ground & Locked
Stance 4 - Slightly Bent Forwards

How to Set Up . . . 

  • Position yourself behind the mat:
    Stand about one metre behind the mat, facing your intended line of play.
    Take a moment to visualize the path from the mat to the jack — mental alignment supports physical alignment.
  • Step forward and place your anchor foot:
    Take a natural walking step forward and position the heel of your anchor foot (right foot for right-handers, left foot for left-handers) on the centre of the mat facing in the direction chosen with most of your body weight on your anchor foot.
    This foot remains in contact with the mat throughout delivery, forming the pivot point for your body’s balance. If the anchor foot is placed incorrectly, step back off the Mat and restart the stance routine.
  • Set your stepping foot:
    Place your stepping foot or leading foot comfortably parallel or slightly in front of the anchor foot, no wider than your shoulders apart, depending on your balance preference.
    Align your head, shoulders, hips, knees, and feet along the delivery line.
    Proper alignment keeps your bowl on its intended path and prevents side sway during the delivery.
  • Position your bowling arm correctly:
  • Lift your bowling forearm parallel to the ground, keeping your wrist locked and flat.
  • Your elbow should be at right angles to the ground — forming an “L” shape when viewed side-on.
  • Ensure the angle of the forearm matches the angle of your anchor foot to the centre line.
  • The arm should move freely from the shoulder socket — avoid lifting it from the shoulder, which causes tension and imbalance.
  • Engage a balanced posture:
  • Bend your knees slightly to maintain flexibility.
  • Lean forward gently from the hips, keeping your shoulders over your toes and your back straight.
  • This forward lean helps with balance and encourages a smooth weight transfer when you deliver the bowl.
  • Support your balance:
    Rest your non-bowling hand lightly on the thigh of your stepping leg.
    This subtle contact adds stability, helps control your descent during delivery, and prevents overreaching.
  • Fix your eyes on the Point of Aim — the exact spot on the green where you want the bowl to begin its curve.
    Keeping your focus steady helps align your body and delivery motion toward the target.

A steady, balanced stance gives you control — if you lose balance at any point, step off the Mat and start again.
Consistency in setup leads to consistency in results. Think of your stance as your “launch platform” . . . the more stable it is, the more accurate your delivery will be.

👉 View Point of Aim in the Technique Hub ›

⚫ The Delivery – The Pendulum in Motion

The Ball-to-Bowl Rhythm Drill has already trained your body to move smoothly and naturally. Now, we simply add the arm swing . . . the pendulum motion that powers the delivery. Think of a grandfather clock: the pendulum swings back and forward in one smooth, balanced rhythm. That’s exactly how your bowling arm should move. The arm will swing back and forward in a pendulum movement along the line of delivery as close to the body as possible.

Think rhythm, not power. The bowl will do the work . . . your job is to deliver it with balance, control, and timing. When your swing feels effortless, your delivery will feel beautiful.

Step-by-Step Delivery Technique

  • Set your stance
  •  Begin from your balanced Stance, eyes fixed on your Point of Aim..
  •  Keep your wrist locked, your arm relaxed, and your body steady.
  • Start the controlled backswing
  • Allow gravity to swing your bowling arm slowly straight back until it moves just past the line of your body.
  • The movement should be smooth, unforced, and fully controlled — this is your backswing
  • Lock the elbow for stability 
  • As the arm straightens at the back of the swing, the elbow locks straight and stays that way until your follow-through is complete.
  • Avoid bending or lifting the arm from the shoulder — let it swing freely like a pendulum.
  • Take your delivery step 
  • As your arm passes behind your anchor foot knee, take a normal walking-length step forward toward your Point of Aim with your stepping foot.
  • Keep your eyes fixed on your target throughout the motion.
  • Begin the forward swing 
  • Once your stepping foot is planted, let the arm naturally move forward again.
  • Transfer your weight from the anchor foot to the stepping foot as the arm swings forward
  • This smooth weight transfer generates both control and momentum.
  • Bend and release

As the arm swings forward:

  • Bend your knees slightly to stay low and balanced.
  • Keep your anchor knee bent to prevent overstepping with the consequence of over-balancing in a forward direction.
  • Keep your back straight and your shoulders over your toes.
  • Slide your non-bowling hand down the thigh of your stepping leg until it rests lightly on your knee — this adds balance and control.
  • Release position
  • Keep eyes on your POA.
  • Release the bowl ~100 mm in front of the toes of the leading foot, close to the surface, rolling it gently off the tips of your fingers along the delivery line.
  • The closer your hand releases the bowl to the grass, the smoother the roll.
  • Ensure your middle finger is centered on the running surface, so the bowl rolls off your fingertips without wobble or deviation.
  • Follow through (hold the line)
  • Continue your arm motion forward, finishing palm up, with the elbow and wrist straight and locked, pointing along the delivery line.
  • Keep your eyes on the bowl until it has rolled at least three metres away — this reinforces line accuracy.
  • Hold this position and watch your bowl travel smoothly down the green. Stay low and hold your follow-through for a slow count of “one… two… three…” or until the bowl is at least halfway up the green.
  • Rising too quickly results in the release of the bowl above the surface causing it to bounce with consequent loss of momentum (weight) i.e. a short bowl!
  • Recover upright (in flow)
  • Then rise slowly, bringing your anchor foot alongside your stepping foot, and remain focused as the bowl comes to rest . . . all in a movement that flows with the follow through.
  • After your delivery, turn sideways and walk behind the mat to allow the next player to bowl.
  • Never step across the mat or into another player’s delivery area.

Understanding the Swing and Weight Control

The distance your bowl travels (short, medium, or long end) depends entirely on the speed of your swing — not on how hard you push.

  • Short ends: Slow, gentle swing.
  • Medium ends: Moderate, steady swing.
  • Long ends: Faster, more extended swing.

Your body should move as one continuous rhythm . . . it’s not a “step, stop, and push” motion.
Bowling is about flow: a relaxed, pendulum-like swing that goes back smoothly and follows through naturally.

Forehand and Backhand Deliveries

There is no difference in technique between a forehand and a backhand delivery. The same rhythm, stance, step, and follow-through apply in both cases.

The only changes are . . .

  • The grip rotation — you turn the bowl so that the bias (small rings) faces the correct direction for the chosen hand.
  • The delivery line — you adjust your aim slightly to allow for the bowl’s natural curve.

Everything else — your arm motion, step, balance, and release — remains exactly the same.
By mastering one consistent delivery technique, you’ll gain confidence to play both hands effectively.

Key Points to Remember

  • The arm swing is one continuous pendulum, not a stop–start motion.
  • Gravity, not force, drives the swing.
  • Keep your eyes fixed on your Point of Aim from setup to follow-through.
  • Smooth rhythm = consistent line and weight.
  • If ever your delivery goes wrong, SLOW EVERYTHING DOWN, that is both the back swing and the forward step.

Understanding the Point of Aim

Your Point of Aim (POA) is the visual target you use to guide every delivery. It’s where you aim your bowl before the bias takes effect and begins to curve back toward the jack.

Learning how to identify and adjust your Point of Aim is one of the most important skills in lawn bowls . . . it connects your line, weight, and green reading into one smooth, confident delivery.

Mastering the Point of Aim transforms guesswork into precision. Discover how to read the green, adjust for bias, and find your perfect aiming line.

👉 Learn How to Find Your Point of Aim in the Techniques Hub

💫 Rhythm & Coordination: “Ball-to-Bowl” Exercise

It’s important to develop rhythm, coordination, and timing.
This fun and simple activity bridges the gap between everyday movement and the smooth, balanced delivery used in lawn bowls. By starting with light objects and progressing to a real bowl, you quickly learn how to coordinate step, swing, and release.

Progressive Steps

  • Partner up and find your space:

Stand about 5 metres apart facing each other on a flat section of the green.
This distance allows comfortable movement and safe control during the drill.

  • Toss and catch using a soft ball or tennis ball:
  • Place your anchor foot (right foot for right-handers) on the centre line.
  • As you step forward with your leading foot, gently toss the ball to your partner, then bring your anchor foot forward.
  • Catch and repeat several times until the motion feels natural and balanced, , focusing on a smooth forward motion.
  • Rolling movement:
  • Using the same rhythm, roll the soft ball or tennis ball along the ground toward your partner. Concentrate on a smooth swing of the arm and steady follow-through along the centre line.
  • Catch and repeat several times until the motion feels natural and balanced, , focusing on a smooth forward motion.
  • Keep your body relaxed.
  • Introduce the jack:
  • Replace the soft ball with the jack.
  • Roll it back and forth along the centre line, maintaining the same stepping and delivery rhythm.
  • Feel the connection between the step, arm swing, and release.
  • Keep it light and controlled — you’re teaching muscle memory.
  • Progress to the bowl:
  • Finally, replace the jack with a bowl and repeat the drill.
  • Focus on the same rhythm and tempo that you used with the lighter objects.
  • Don’t worry about accuracy . . . this drill is designed to develop smooth, flowing movement. The goal is to feel your body moving naturally forward through delivery.
  • Observe and adjust:
  • Notice how the bowl feels heavier and requires slightly more timing.
  • Keep your delivery smooth and balanced, with your weight transferring forward as you release.
  • Finish each roll with your arm extended and palm facing upward — your classic follow-through
  • A relaxed rhythm leads to accuracy — tension breaks the flow.

Purpose and Learning Outcome

This exercise teaches the natural timing between step and delivery, helping you develop a smooth, rhythmic action, - “feel” the motion rather than over-think it.
Once this rhythm becomes automatic, it forms the foundation of every successful delivery. It builds coordination, balance, and confidence before adding the complexity of line and weight control.

Stage 6: Playing Formats & Roles

This stage introduces the different playing formats in lawn bowls and explains the roles each player performs within a team.

Understanding how games are structured—and where your contribution fits—helps you move from practicing skills to enjoying real match play with clarity, purpose, and confidence on the green.

This section covers . . .

  • Varying Formats — singles, pairs, triples, and fours, and how each game is played.
  • Player Roles — the responsibilities of lead, second, third, and skip within a team.

🧩 Varying Formats 

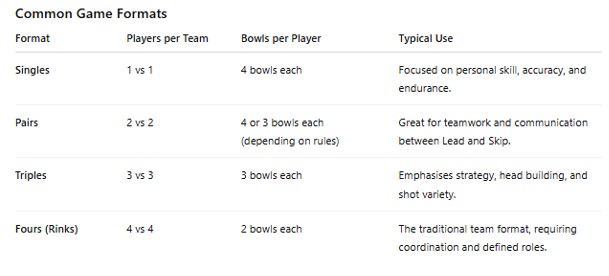
Lawn bowls can be played in several different formats, each creating a slightly different rhythm, pace, and team dynamic.
While the basic objective remains the same . . . finishing closer to the jack than your opponent . . . the way the game unfolds changes depending on how many players are involved and how responsibilities are shared.

Some formats place greater emphasis on individual consistency and concentration, while others highlight team communication, support, and shared decision-making.

As a beginner, experiencing different formats helps you develop adaptability, teaching you when to focus on steady drawing, when to protect position, and how to contribute positively within a team environment.

Understanding these variations is less about memorizing structure and more about recognizing how the feel of the game changes.

This awareness builds confidence and prepares you to step comfortably into club play, social matches, and early competition, no matter which format you encounter.

Common game Formats in Lawn Bowls

🧩 Player Roles

Roles Within a Team

In team formats, each player has a clear role and responsibility that contributes to the overall success of the end. From the lead, who sets the early position, through the second and third, who build pressure and create opportunities, to the skip, who guides strategy and plays the final shots, every position plays an important part.

For beginners, the goal is not to master every role immediately, but to understand how teamwork functions on the green.
Learning what each player is trying to achieve helps you make better decisions, support your teammates, and recognise how your own bowls influence the developing head.

As your confidence grows, this understanding makes it easier to move between roles, communicate clearly, and enjoy the shared challenge of working together toward a single result.

This sense of contribution and teamwork is one of the most rewarding parts of lawn bowls and a key step in progressing beyond the beginner stage.

Lead

  • Delivers the jack and the first bowls of each end.
  • Aims to build a strong foundation by drawing close to the jack.
  • Focuses on consistency and accuracy in length and line.

Second

  •  Supports the head by adding positional bowls.
  •  May play cover shots or conversions as directed by the Skip.
  •  Records the score and keeps track of the head if required.

Third (or Vice-Skip)

  •  Assists the Skip in strategy and measuring.
  •  Plays versatile shots — draws, trails, and conversions depending on the situation.
  •  Communicates with the Skip about the head before final decisions are made.

Skip

  •  The team leader and strategist.
  •  Stands at the head to direct play and choose shot selections.
  •  Plays the final bowls of each end, often under pressure, to secure or defend points.
  •  Communicates clearly with all teammates and maintains positive team morale.

Each role is equally important . . . the Lead sets the tone, the Second builds, the Third adjusts, and the Skip finishes.
Learning every position over time gives you a full understanding of the game and makes you a more adaptable and valuable player.

🏅 Explore the Team Roles in Detail

🌿 Ready for Your Next Step?

Well done — you’ve covered the essentials! Now that you understand the basics of play, safety, and green etiquette, it’s time to take the next step into your first team position . . . the Lead Role.

🟢 Go to Lead Role →

>